
Invoicing with 2 Different Sales Tax Rates using QuickBooks
In some places you have to apply two different sales taxes, QuickBooks is not designed to do it automatically, but allows you to create a form with the information and calculations.
Instructions
Before calculate and print multiple sales tax items, you have to perform two previous steps: setting up the sales taxes and subtotal items.
Sales Tax items Creation:
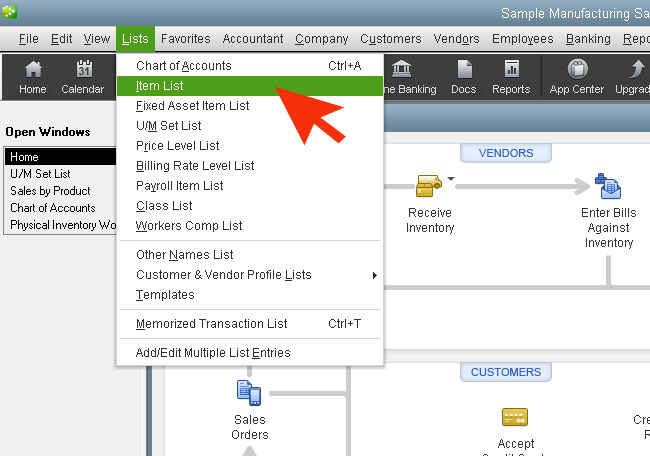
1. Lists > Item List.
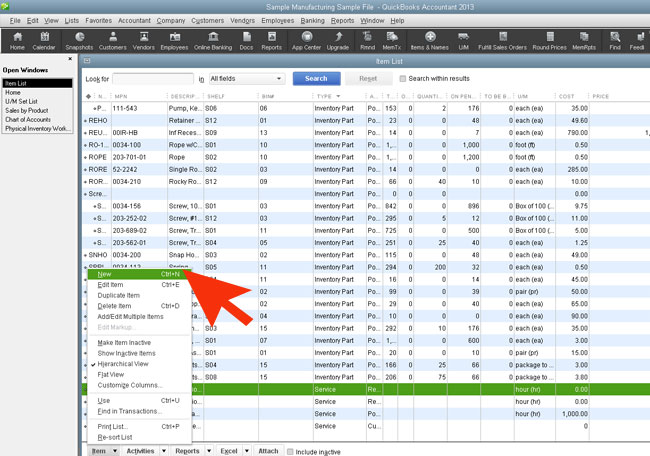
2. Click Item > New
3. From Type, select Sales Tax.
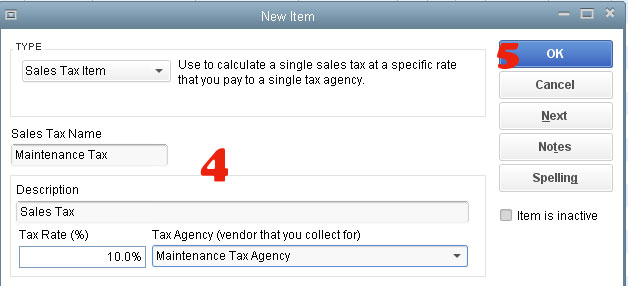
4. Fill all the required information: Sales Tax Name, Rate (%) and Tax Description, Agency’s Name information.
5. OK.
6 . Repeat the above steps as many sales tax items you will need.
Subtotal item Creation:
- Lists > Item List.
- Click Item > New.
- From Type, select Subtotal.
- Fill the item Name, Number, and Description.
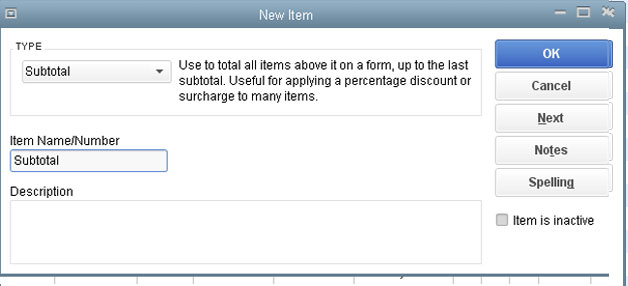 5. OK
5. OK
Creating an invoice using multiple sales tax items:
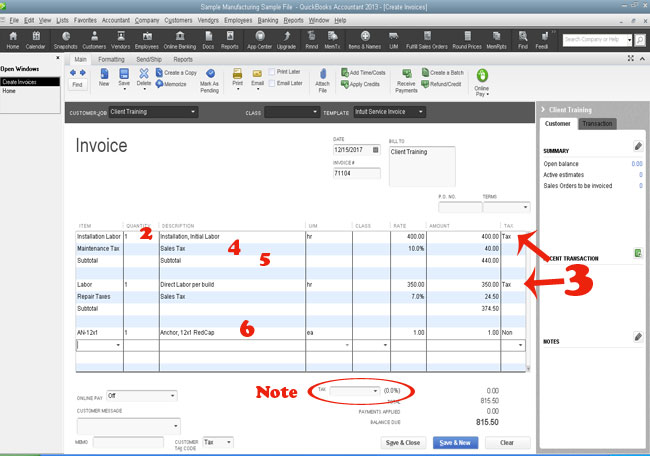
Note: Before start be sure that the sales tax box (below the sales form) is 0% (Out of State), this is very important to calculate different sales tax by item.
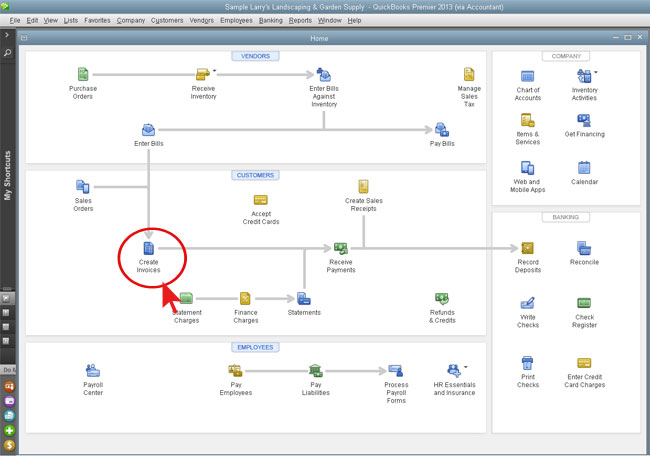
- From Customers (we prefer use Home to make the selection) > Create Invoices (or Sales Receipt).
- Enter the taxable items (Note: the nontaxable items must be added later).
- Right side of each item click the taxable code (Tax or Non)
- Enter the sales tax item directly below the item.
- Enter the subtotal item after entering all taxable items to generate a subtotal( QuickBooks will calculate the amount).
- When you finish with the taxable items enter the nontaxable items (if is any) with the non-taxable code to the right.
 Save: Print, save or close.
Note: The above steps are NOT applicable in QuickBooks for Mac.
Crear Facturas calculando 2 diferentes Impuestos de Ventas
En algunos lugares hay que aplicar dos impuestos diferentes, QuickBooks no está diseñado para hacerlo automáticamente, pero le permitirá crear un formulario con la información y cálculos necesarios.
Instrucciones Detalladas
Antes de calcular e impresión varios elementos del impuesto sobre las ventas, usted tiene que realizar dos pasos previos: impuestos a las ventas y los artículos del subtotal.
Sales Tax items Creation:
- Selección en “Lists” > “Item List”.

- Haga click en “Item” > “New”.

- En “Type”, seleccione “Sales Tax”. Llene toda la información requerida: nombre del impuesto sobre las ventas, tasa (%) y descripción del impuesto, información del nombre de la agencia.

- Haga click en “OK”
- Repita los pasos anteriores tendrá todos los elementos impuesto sobre las ventas.
Subtotal item Creation:
- Seleccione en “Lists” > “Item List”.
- Haga click en “Item” > “New”.
- En “Type”, seleccione “Subtotal”.

- Llene toda la información requerida: “Name”, “Number”, and “Description”.
- Haga click en “OK”
Crear una facturar con diferentes impuestos a las ventas:
Antes de empezar Asegúrese de que el cuadro del impuesto a las ventas (debajo del formulario de ventas) esté en 0% (de estado), esto es muy importante para calcular diferentes impuestos sobre las ventas por artículo.
- En Customers (Nosotros preferimos usar Home para hace esta selección) > Create Invoices (o Sales Receipt).

- Registe los artículos sujetos a impuesto (Nota: los que no sean se agregarán al final).
- En el lado derecho señale el código para impuestos (Tax o Non)
- Debajo del artículo, registre el “sales tax item” correspondiente.
- Registre el item “Subtotal” (QuickBooks hará los cálculos correspondientes).
- Ahora register artíiculos no sujetos a impuestos ( si hay alguno).

- Salve, imprima o salve y cierre
Nota: Las sugerencias de este artículo no se pueden aplicar en QuickBooks para Mac


